Zsh+oh My Zsh+vscode配置记录
Linux的默认终端切换目录有点繁琐,找到了一个用着更方便一些的终端zsh
参考教程:zsh 安装与配置,使用 oh-my-zsh 美化终端 | Leehow的小站
安装zsh和oh-my-zsh
首先安装zsh
|
|
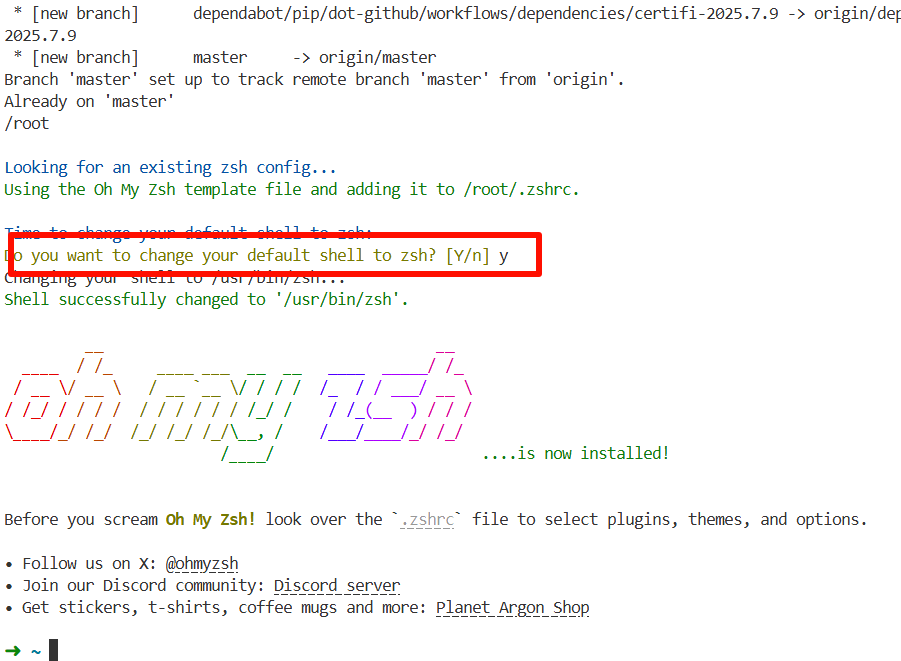
然后设置默认终端为zsh,我这里是使用root用户设置的
|
|
接下来安装oh-my-zsh
官网:http://ohmyz.sh/
以下是教程中提供的安装方式:
| Method | Command |
|---|---|
| curl | sh -c "$(curl -fsSL https://install.ohmyz.sh/)" |
| wget | sh -c "$(wget -O- https://install.ohmyz.sh/)" |
| fetch | sh -c "$(fetch -o - https://install.ohmyz.sh/)" |
| 国内curl镜像 | sh -c "$(curl -fsSL https://gitee.com/pocmon/ohmyzsh/raw/master/tools/install.sh)" |
| 国内wget镜像 | sh -c "$(wget -O- https://gitee.com/pocmon/ohmyzsh/raw/master/tools/install.sh)" |
安装中弹出这个提示时需要同意使用 Oh-my-zsh 的配置模板覆盖已有的 .zshrc。
从.bashrc中迁移配置(可选)
如果之前在使用bash时自定义了一些环境变量、别名等,那么在切换到zsh后,你需要手动迁移这些自定义配置。
|
|
root用户在执行sudo su命令后,再运行上述代码查看、手动复制、粘贴自定义配置。
配置主题
根据 What’s the best theme for Oh My Zsh? 中的排名,以及自定义化、美观程度,强烈建议使用 powerlevel10k 主题。
|
|
在 ~/.zshrc 设置 ZSH_THEME="powerlevel10k/powerlevel10k"。接下来,通过exec zsh重启 zsh 并配置
旧的安装方式(已废弃)
克隆项目到本地
|
|
在 ~/.zshrc 文件中配置这项:
|
|
通过exec zsh重启 zsh 并配置
如果想回到最初向导、重新对 Powerlevel10k 进行配置,可以执行:
|
|
废弃原因
| 安装方式 | 直接克隆到Oh My Zsh目录 | 克隆到自定义目录 |
|---|---|---|
| 命令 | git clone --depth=1 https://github.com/... ${ZSH_CUSTOM}/themes/powerlevel10k |
git clone --depth=1 https://github.com/... ~/powerlevel10k |
| 主题路径 | 自动放入Oh My Zsh的标准主题目录(~/.oh-my-zsh/custom/themes/) |
需手动指定路径(如~/powerlevel10k/powerlevel10k.zsh-theme) |
| Oh My Zsh兼容性 | ✅ 原生支持(自动识别主题) | ❌ 需手动配置路径,可能引发兼容性问题 |
| 更新维护 | ✅ 可通过Oh My Zsh插件管理(如omz update) |
❌ 需手动进入目录执行git pull |
| 多主题切换 | ✅ 直接修改ZSH_THEME="主题名"即可 |
❌ 需修改为绝对路径(如ZSH_THEME="~/powerlevel10k/powerlevel10k.zsh-theme") |
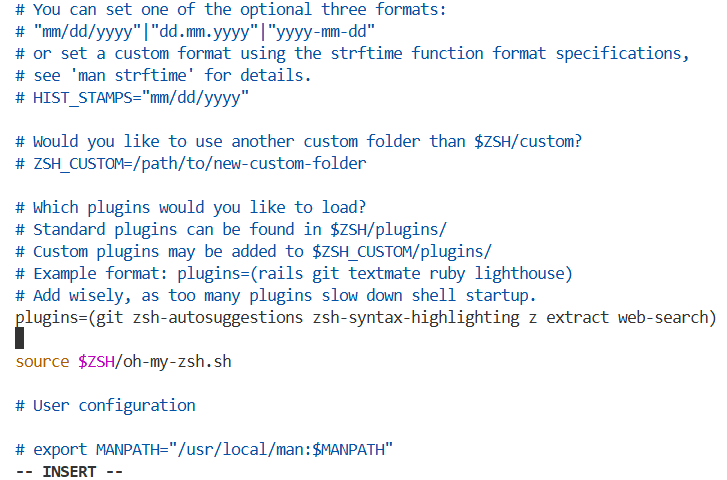
安装插件
oh-my-zsh 已经内置了 git 插件,内置插件可以在 ~/.oh-my-zsh/plugins 中查看,更多插件可以在 awesome-zsh-plugins 里查看。
zsh -autosuggestions
zsh-autosuggestions 是一个命令提示插件,当你输入命令时,会自动推测你可能需要输入的命令,按下右键可以快速采用建议。
安装方式:把插件下载到本地的 ~/.oh-my-zsh/custom/plugins 目录。
|
|
zsh-syntax-highlighting
zsh-syntax-highlighting 是一个命令语法校验插件,在输入命令的过程中,若指令不合法,则指令显示为红色,若指令合法就会显示为绿色。
安装方式:把插件下载到本地的 ~/.oh-my-zsh/custom/plugins 目录。
|
|
z
oh-my-zsh 内置了 z 插件。z 是一个文件夹快捷跳转插件,对于曾经跳转过的目录,只需要输入最终目标文件夹名称,就可以快速跳转,避免再输入长串路径,提高切换文件夹的效率。
extract
oh-my-zsh 内置了 extract 插件。extract 用于解压任何压缩文件,不必根据压缩文件的后缀名来记忆压缩软件。使用 x 命令即可解压文件,例如:x 1panel-v2.0.0-linux-amd64.tar.gz
web-search
oh-my-zsh 内置了 web-search 插件。web-search 能让我们在命令行中使用搜索引擎进行搜索。使用搜索引擎关键字+搜索内容 即可自动打开浏览器进行搜索,例如:baidu swift
启用插件
修改~/.zshrc中插件列表为:
|
|
开启新的 Shell 或执行 source ~/.zshrc,就可以开始体验插件。
卸载 Oh My Zsh
终端输入 :
|
|
终端提示信息:
|
|
在 VSCode 中使用 zsh 和 Nerd 字体
首先在GitHub - romkatv/powerlevel10k: A Zsh theme下载这4中字体
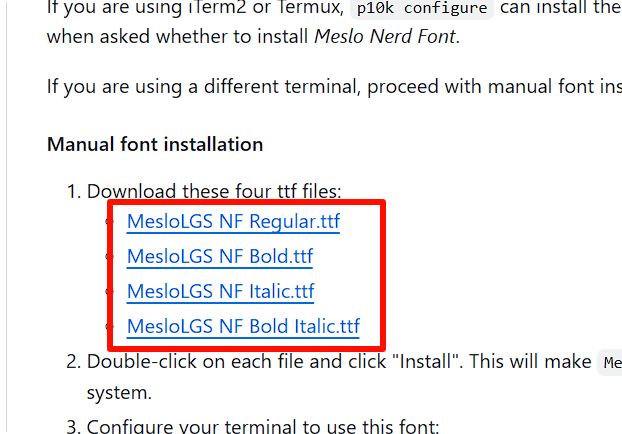
如果是Windows环境直接双击安装即可
在Linux环境中,需要进行如下操作:
复制字体文件
将下载好的 .ttf 文件放到个人字体目录:
|
|
或者将字体复制到系统字体目录(需要管理员权限):
|
|
刷新字体缓存
|
|
验证安装
通过以下命令查看安装的字体是否能被系统识别:
|
|
若能输出字体路径,说明安装成功。
设置 zsh 为默认终端
打开 VSCode,进入 设置(Settings)。
搜索:terminal.integrated.defaultProfile.linux
找到 Terminal > Integrated > Default Profile: Linux,将其更改为 zsh。
新建终端时即可默认使用 zsh
设置 VSCode 终端字体
在设置搜索栏输入:terminal.integrated.fontFamily
将其设置为刚安装好的 Nerd 字体名称。例如:
|
|
重启 VSCode,使新字体生效。